Add Stages
Add and configure stages in a workflow. Each stage represents a discrete task that one or more agents execute. Stages are created and edited entirely in the Visual Builder -- the workflow canvas.

This page shows how to do it manually. The faster, more common way is to describe what you want to the Workflow Assistant — it builds the team, stages, agents, and assignments for you, then you fine-tune by hand using the steps below.
Prerequisites
- An existing workflow assigned to a team (see Create a Workflow)
Steps
1. Open the workflow
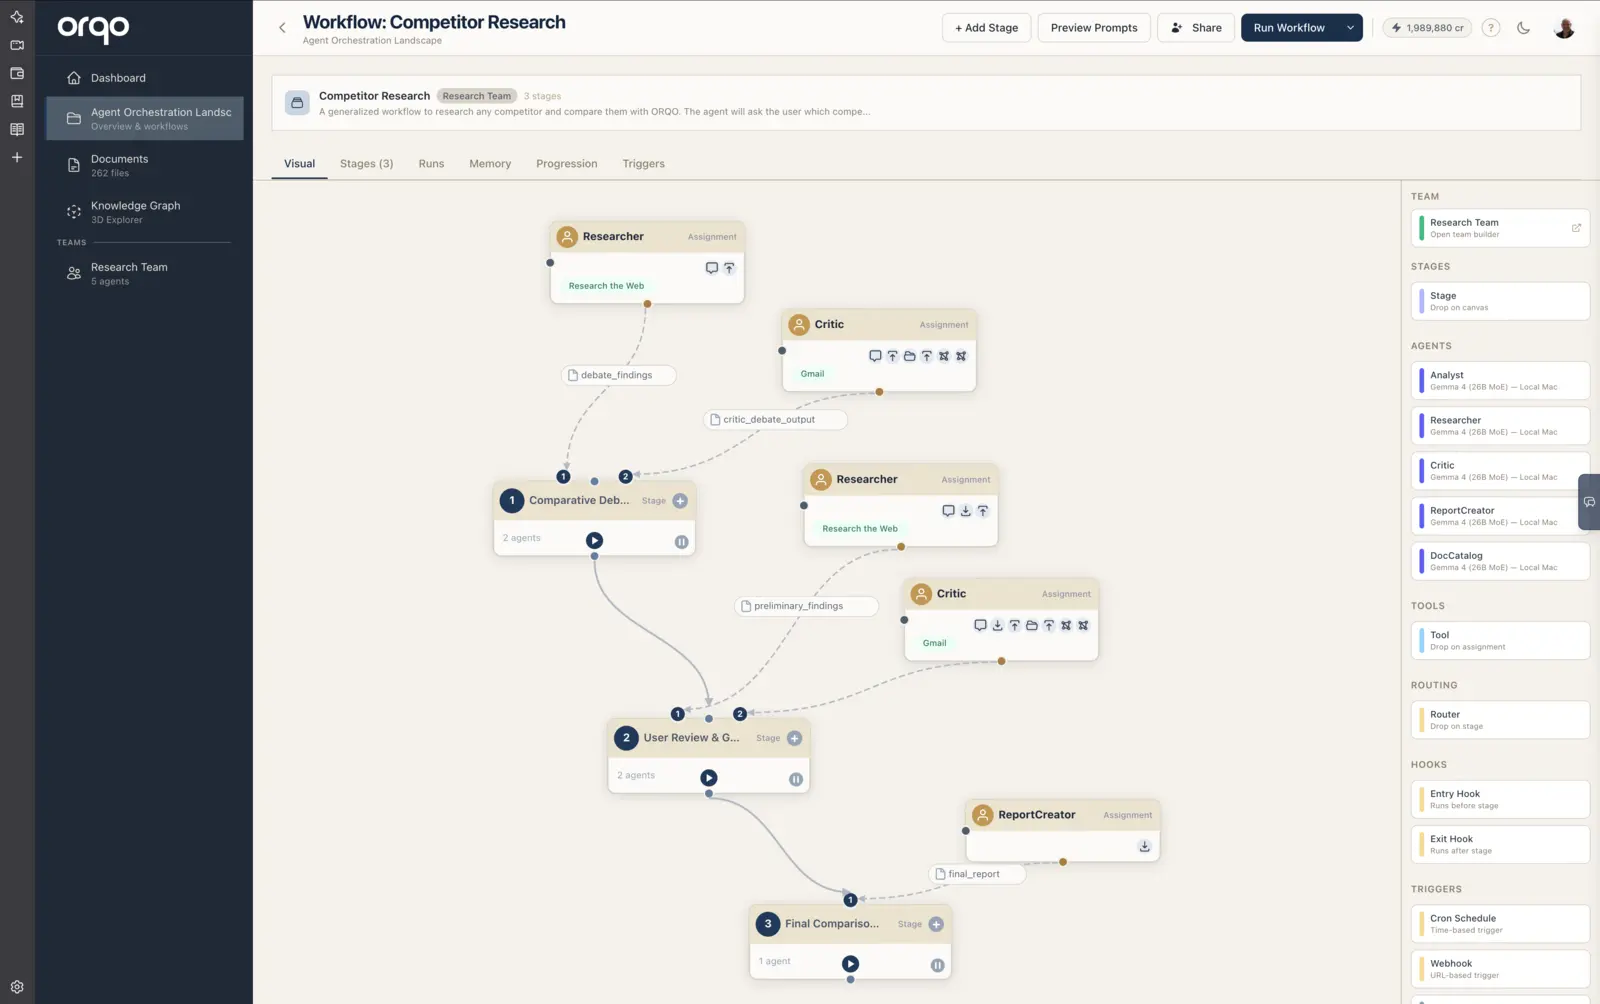
Navigate to your project, then open the workflow. The page opens on the Visual tab -- the Workflow Builder canvas -- alongside the Runs, Memory, Progression, and Triggers tabs.
2. Add a new stage
There are two ways to add a stage, both on the Visual tab:
- Click + Add Stage in the workflow page header. A new stage node appears on the canvas.
- Drag a Stage card from the palette on the left of the Visual Builder onto the canvas.
3. Open the stage drawer
Click any stage node on the canvas to open its edit drawer. The drawer title is the stage's name. Because branching (not a fixed position number) determines execution order, stages are identified by name rather than by a step number.
4. Configure the stage
The stage drawer pins the Assignments list at the top, above a tab bar with three tabs -- Main, Routing, and Hooks:
Assignments (pinned at the top) -- The agents assigned to this stage (see Set Up Assignments).
The Main tab holds the stage basics and limits:
- Stage -- The core stage fields:
- Name -- A descriptive name for the stage (e.g., "Research", "Draft Content", "Review")
- Description -- What this stage accomplishes
- Summary Mode -- How the stage's output is summarized for downstream stages
- Runtime -- Which runtime environment to use (if the stage needs code execution)
- Limits -- Two safety caps grouped together:
- Max Cycles -- How many tool-calling turns one agent may take in this stage before it's forced to finish (default 30)
- Loop Guard -- How many times routing may re-enter this stage before it's forced onward (default 5)
- Seed Artifacts -- A collapsible section for seeding artifacts from prior runs into the stage.
The Routing tab maps outcomes to targets (see Use Outcome Routing).
The Hooks tab holds the entry and exit hooks (see Configure Hooks).
Summary Mode controls what information downstream stages receive. Use full when the next stage needs complete context, condensed for a compressed summary, or none if the output is only used via explicit data passing.
5. Understand stage order
There is no position-based reordering list. A stage's place in the flow is determined by outcome routing -- which stage each outcome hands off to -- not by a position number you set by hand.
- A purely linear workflow simply falls through from one stage to the next.
- To branch, loop back, or skip ahead, map an outcome to a target stage on the Routing tab.
See Use Outcome Routing for how to wire the flow between stages.
6. Add multiple stages
Repeat steps 2-4 for each stage in your workflow. A typical workflow has 2-5 stages, but there is no hard limit.
Example stage sequence for a content pipeline:
| Name | Purpose |
|---|---|
| Research | Gather information from web sources |
| Draft | Write initial content based on research |
| Review | Quality check and fact verification |
| Publish | Format and deliver final content |
7. Read the flow on the canvas
The Visual Builder renders stages as a flow diagram. A purely linear workflow renders as a single top-to-bottom chain. When a stage branches to different downstream stages (see Use Outcome Routing), the builder lays the branches out as a tree -- side-by-side subtrees rather than one column -- so you can follow each path end to end.
Each stage appears as a card with:
- A colored header bar showing the stage name in a pill. Because branching means there is no single fixed execution order, cards are identified by name rather than by a step number.
- Agent assignment ports along the top edge
- Flow connector dots linking to the next stage
- Diamond indicators on the edges if hooks are configured
8. Enable, disable, or run a single stage
Each stage node carries its own controls on the canvas:
- Use the pause control to disable a stage (skip it during a run) and the play control to re-enable it.
- Use the run control to execute that single stage on its own -- handy for testing one step without running the whole workflow.
What's next
- Set Up Assignments to assign agents to each stage
- Configure Hooks to add entry and exit hooks
- Use Outcome Routing to add branching logic